


.png)
%20(1).png)
.png)


.svg)
.svg)
.svg)

.png)
.png)
.png)
.svg)
.svg)
%20(1).png)
.svg)
.png)


.png)
.svg)
.svg)
.svg)

%20(1).png)
.png)
.png)

.png)
.png)
.svg)
.svg)
%20(1).png)
%20(1).png)
.png)


How the Instagram Algorithm Works in 2026
Your content, digital marketing, and social media campaigns are highly dependent on visual content. Fortunately, you don't have to be a graphic designer genius to create captivating images for every Facebook ad that can catch your audience's attention.
Canva makes the challenging task of generating graphics super easy with their gorgeous and flexible Canva templates, stock photos, elements, and drag and drop interface. Knowing how to create a logo on canva is a marketing super power. And did you know that there are some tweaks and shortcuts to make your Canva experience better?
Yes, we've got a few Canva examples that can help you breeze through graphics creation, and we're sharing them with you.
See All the Free Elements Before You Buy
Canva has a ton of beautiful elements you can use. If you have Canva Pro, then you'll be able to access all of them for free. But if you want to try out the app first before you subscribe to the paid version, you'll have the option to buy only the elements you want to add to your design.
However, if you want to browse through the free library first to check if it has what you need before you hit that purchase button, then here's a little trick to help you go about it quickly and easily.
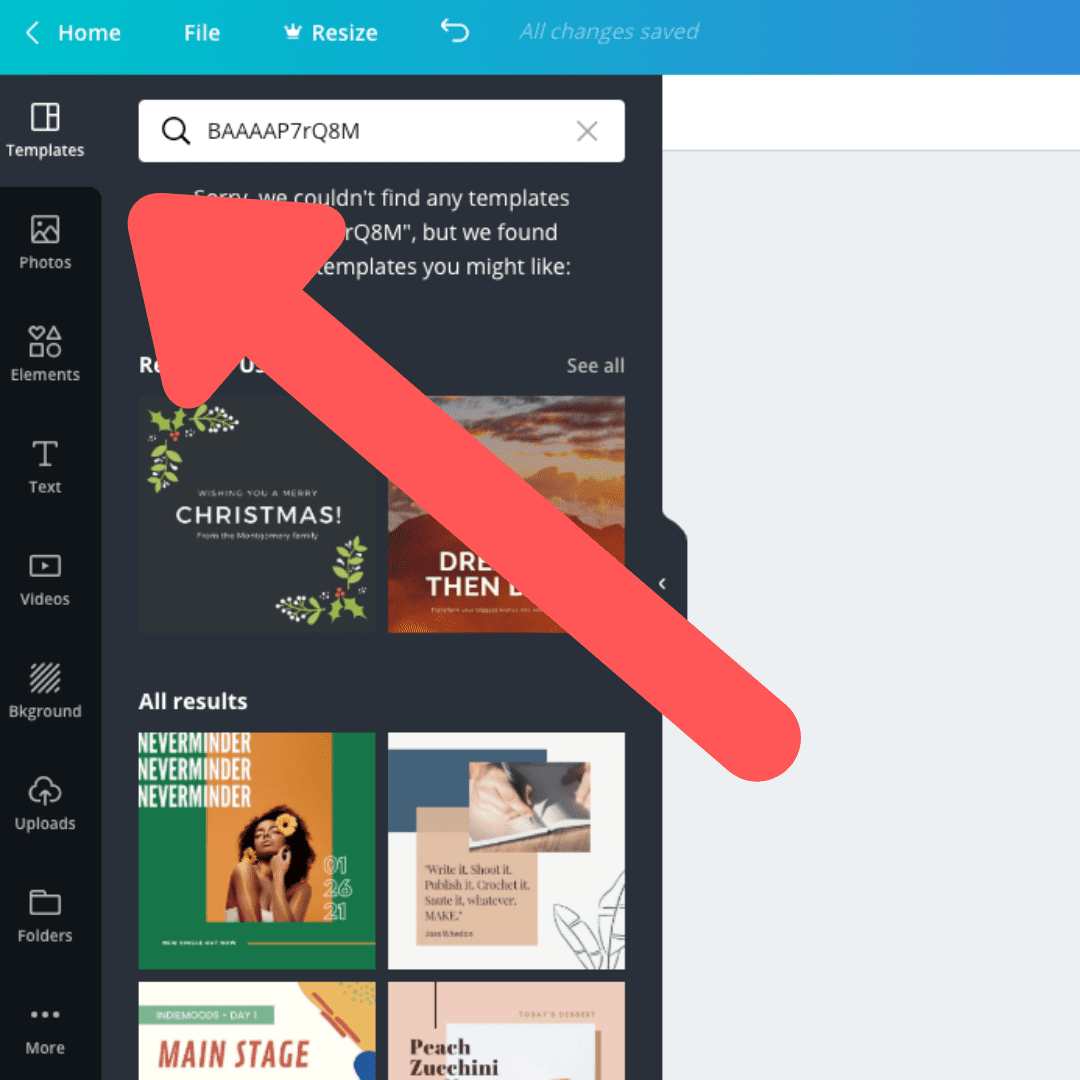
You only have to copy one of these codes:
brand:BAAAAP7rQ8M
brand:BAAMOuJH0Ec
Paste these codes on Canva's search field, then hit Enter. Canva will filter all the free elements for you to view and choose from. Of course, if you can't find what you need from the free library, you can remove the watermark from the elements and use them on your design for only a dollar.
Or, if you want access to all of them, you can get their Pro version.
Add Text Quickly
Second, on our list of Canva hacks is a neat trick for quickly adding text.
Adding text in Canva only requires choosing a text style and then clicking it with your mouse. But, if you need to add a bunch of different text boxes to your Canva layout, this simple task can get a bit tedious.
Here's a little trick to help you complete the process faster. This hack won't even require you to use your mouse to click on the text menu. You also don't have to search for the text style! You can use this simple keyboard shortcut.
And no, that wasn't a typo. You only need to hit "t" on your keyboard to get a text box on your design. Once that's done, you can type the text that you want on it. Easy peasy!
Undo and Redo
As they say, nobody's perfect. We make mistakes. And designing on Canva is no exception. There are times when we want to try a different way and choose other styles - we drag the image to the bottom part, move the text somewhere on the side, change the background colors - only to find out later on that the previous design was better.
There are also instances when we accidentally change something that distorts the look of the graphic. Well, here's a little something to ease your worries.
CTRL + Z
CTRL + SHIFT + Z
If you want to undo the previous action, you only need to hold your CTRL key and then hit Z. If you did many things (on your design) that you want to undo, you could hit CTRL + Z a few times until you're satisfied.
Want to redo the action you've undone? No problem! Hold your CTRL key, then your 'SHIFT' key, and hit Z. Like the previous keyboard shortcut, you can also do this a couple or more times until your design's back to the state that you like. This is one of our favorite Canva hacks. So simple. So fast.
Zoom In and Zoom Out
Do you want to take a closer look at your Canva design to ensure that it's all good but find clicking the zoom percentage button at the bottom part of your Canva workspace a chore? Then these keyboard shortcuts can help.
CTRL + (+)
CTRL + (-)
If you want to zoom in, then hold your CTRL key and then press the + button on your keyboard. Once you're done checking (or editing) and want to see the full image, you can zoom out by holding the CTRL key and then pressing the - button.
These Canva hacks are so simple, but they can shave precious seconds off your graphic design work.
Freely Move Elements
When you move elements around your page, there are instances when they don't go where you want them to. Canva has a feature that automatically snaps the elements to the invisible gridlines to help you align them faster. While it can be handy at times, there are moments when you want to get rid of it. This little hack can be used during those moments.
SHIFT
To freely move elements on your Canva page, all you need to do is hold the SHIFT key and then drag the design element around with your mouse. This prevents Canva from automatically aligning your image, making moving objects in tiny increments easy.
Tweak Pre-Set Templates
Canva has plenty of gorgeous and professionally-made templates. And one of the best things about every template - aside from them being pre-set - is that you can tweak them to better suit your business' theme. This way, you don't have to start from scratch, and your graphics will still look unique.
Get Inspiration From Completed Designs
If you need to start from scratch and don't know how to go about it, you can get inspiration from completed designs. You can go to Canva's Design Inspiration and find examples to help you get over creative blocks. Or head over to Google and search for samples to guide you through your layout.
You can also incorporate the following tips to help make your graphics stand out.
6 Design Hacks for Better Graphics
1. Pair Complementary Fonts for a Balanced Design
Opposites attract, and this also applies to fonts. For instance, if you're using display fonts, it's best to pair them with a more neutral font to balance it out. Another example is using a Serif font with a Sans-Serif font.
2. Match Colors With Your Background Image
It's not always easy to choose the right font color for the text on your design. So, here's a little tip to somehow help you make the decision.
Match colors within your image.
For example, if your background has a lot of color red, then it might be safe to use the same color for your text. All you have to do is use a color picker tool to get the color's code and then paste it on Canva's color tool.
If the text is difficult to read because of the colors, you can add a white shape element behind the text and reduce its transparency to make it stand out.
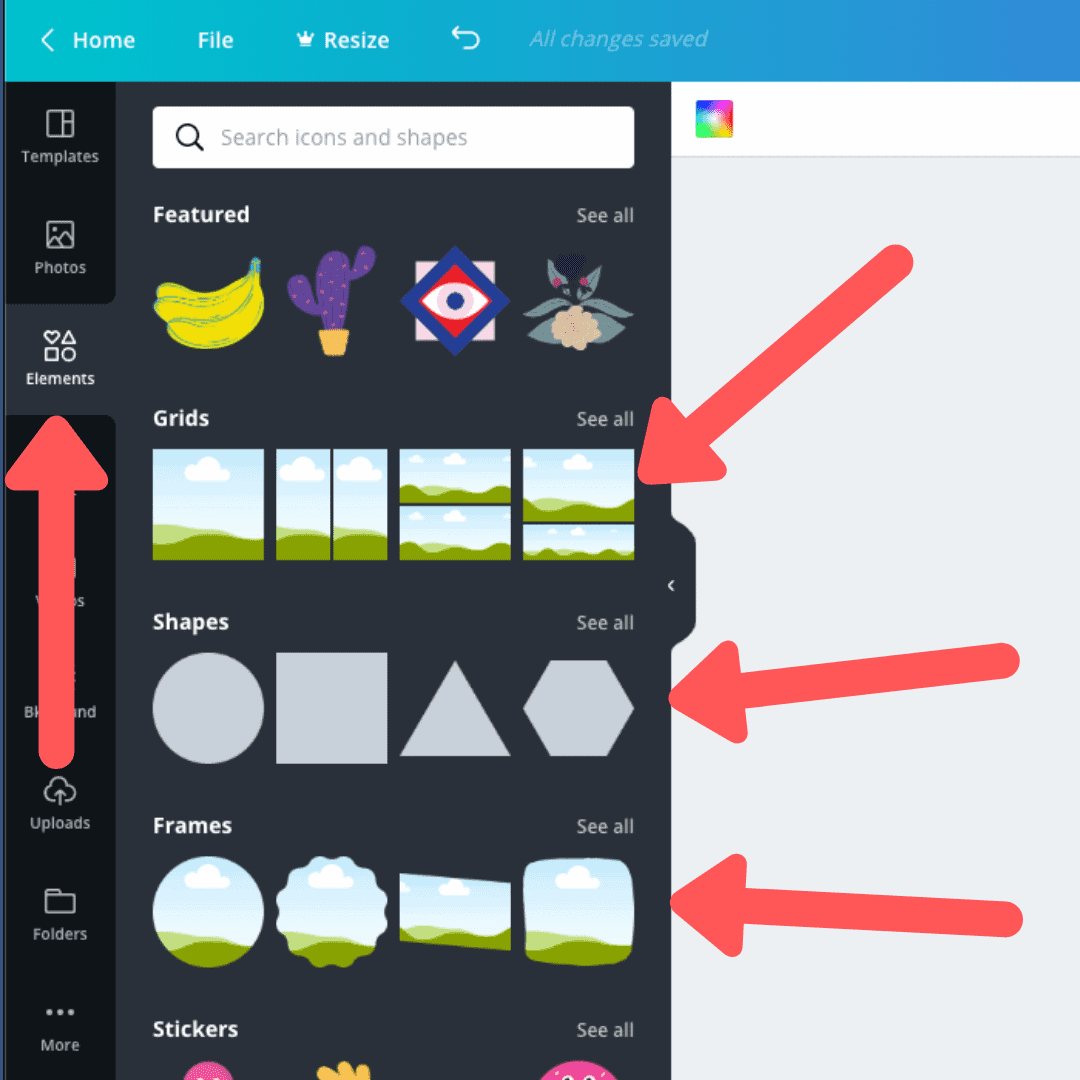
3. Use Grids
Do you want to add a bunch of images to your graphics?
You can use grids to arrange them beautifully. Canva's design tool has many grid designs you can utilize to suit the type of graphics you want. Go to Elements, choose among the different grids available, and then drag it to your page. You can add multiple grids and resize them if needed!
4. Experiment with Shapes
Sometimes, the only thing you need to make your graphics shine is a shape. Canva has a ton of free shapes you can use for this purpose. Here are some examples you might want to try.
Use Frames or Borders to Draw Attention to Your Text
There are times when your background overwhelms the message you want your audience to see. In some cases, you can use frames or borders to add a solid line on your text to draw attention. It helps provide a simple yet elegant look to your design.
Add Lines to Emphasize Words
Do you want to emphasize a word on your graphics to get your message across? You can use lines to do this. For instance, you can add a solid line underneath the word you want to stress.
Use Shapes to Highlight
You can also use shapes for highlighting words or images. For example, you can put a shape behind your text to draw attention to it. You can even change its transparency if you don't want to completely cover the background.
5. Adjust the Colors of Your Photos Whenever Needed
There are times when the colors of your photos don't make the cut. Often this is due to low lighting. However, this isn't an excuse to produce dreary graphics.
Canva has a photo adjustment feature that enables you to tweak your photo's colors to suit your design. You can adjust the brightness, contrast, saturation, tint, and other aspects to make sure that you precisely get the graphics you want. If you prefer, you can also make use of Canva's filters to quickly adjust the colors.
6. Be Consistent
Finally, when you're creating graphics for your brand, it's important to keep a few elements consistent. It's good to choose the same brand colors, fonts, filters, and overall color palette when making your designs for easy visual recognition.
Which one of these Canva hacks did you find the most helpful? Try out these tips the next time you're creating graphics.
Frequently Asked Questions
Can we hack Canva?
Not easily. Canva is a very user-friendly platform, but it's not easy to hack. In fact, the team at Canva has put a lot of effort into making sure its platform is difficult to hack. This means that any attempts to do so would likely be unsuccessful unless you are a professional!
Is it unprofessional to use Canva?
No, it is not unprofessional to use Canva. In fact, Canva is a great way to create professional-looking visuals for your business or brand. Canva makes it easy to create beautiful graphics with a simple drag-and-drop interface. You can create designs for everything from social media posts to flyers and presentations. And best of all, Canva is free to use!
How do I get Canva Pro for free?
It's easy! Just sign up for an account as a student. Canva Pro is free for students, and you'll have access to all of the features of the Pro plan, including unlimited storage and bandwidth, custom branding, and priority support. Plus, you can use your student discount to save on other design products and services from Canva.
Why Canva Cannot remove background?
It's not that Canva can't remove the background--it's that they require a subscription to their "Pro" plan in order to do so. And honestly, it's a good thing they do, because otherwise everyone would be removing the backgrounds of all their images and there would be no consistency in terms of image quality on the platform.

%20A%202026%20Explainer%20%201296x600px.png)


